
Tuesday, February 22, 2011


Wednesday, February 16, 2011
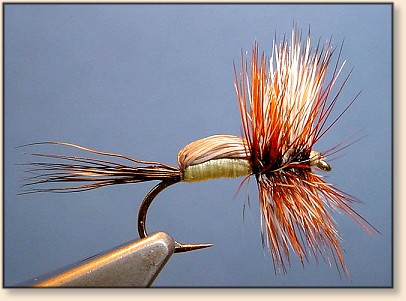
Fly of the Week: EMERGENT SPARKLE CADDIS

Spring is the time when we all look for the great hatches of mayflies, stoneflies, midges and most important for many of us caddis flies. Gary LaFontaine and his team studied caddis flies, and his book Caddisflies is the standard on the subject. He describes many fly patterns to imitate caddis species. Two of those are Deep Pupa and Emergent Pupa. If you have an opportunity to read Caddisflies do it. There is much there to help you be a better fly angler. You will also see there are many more great patterns and many variations of the Deep Pupa and Emergent Pupa patterns.
Zelon or Antron have a trilobal (three sided) fiber structure which has many advantages. Does it make good flies? You become a believer when you read pages 32-39 in Caddisflies. Statements like: “…in clear water the Sparkle Caddis Pupa drew the attention of trout three and a half feet away, while in the same situation a standard pupa drew the attention of fish no farther than a foot away.” and “The Emergent Pupa…on the stream was roughly three times better than a fly lacking the imitation of an air sack,…” It doesn’t clump or matt like other materials. It makes the fly carry air bubbles, and “The Emergent, hanging half I and half out of the water, kicks off a constant stream of bubbles.” This was part of the patterns unexpected effectiveness. At times the Emergent Pupa even broke selective feeding cycles. What more do you want?
Fish feeding on emergers are often mistakenly thought to be feeding on adults. Several years ago I watched a couple of fly anglers fishing over a bunch of rising fish. Since they were fishing the water I desired I watched them from a high spot. Through binoculars I could see the actively rising fish, and their floating flies drifting along untouched. However, most important I could see adult caddis floating unscathed for several hundred feet before they took flight. After the frustrated anglers left, they caught no fish, my friend and I went down and proceeded to hook and release many fish on pupa and nymph imitations.
How do you fish the Emergent Sparkle Caddis? Read pages 99 – 114 in Caddisflies for a complete discussion, but I’ll try to condense it a little. First is the dead drift approach. The fly is kept awash in the surface film where a trout can porpoise and eat it. For the caddis that does not ride quietly on the surface Gary recommends “the stutter and drift method,” which is more active. Put a slack line curve cast up and across with the fly landing downstream of the line. Then make a quick mend before the fly starts to drag. The mend should do no more than make the fly stutter sideways a little. Release a little line to extend the drift. Some species of caddis Gary calls runners or paddlers; Canadians call them traveling sedges. These caddis move across the surface more or less in a straight line and either take off or are recycled into trout with an explosive rise. Grease the fly, and retrieve it with long pulls to move it across the water surface. I have also watched caddis swim around in circles before taking off, but I have never figured a way to move the fly like that.
Enough talk, let’s tie it.
Materials & Equipment:
Hook: Dry Fly hook
Thread: 6/0 brown
Bubble or over body: Micro Zelon, a new product, was used to tie the pictured fly, but Zelon or Antron yarn are normally used, tan or caddis gold
Underbody: Mole hair and Quick Fingers Touch Dubbing
Head: Dubbed mole or peacock
Step 1: Start thread about mid shank, and wind rearward to the bend which on most regular dry fly hooks is a point right over the barb.

Step 2: Attach two clumps of Zelon or Antron at the bend of the hook. Place one bundle of Zelon or Antron on each side of the hook. As you tie, try to spread the fibers around the hook. Antron yarn might need to be combed out to fluff it enough to make a good over body.

Step 3: Ellen uses a variety of colors for the underbody, but on this fly she used mixed mole and Quick Fingers Touch Dubbing. Most tiers put a tacky dubbing wax on the thread and just touch the thread with a dubbing ball. She said that the touch technique was developed by Gary LaFontaine. Don’t roll it down like making a tight noodle. Note, about one quarter shank length is uncovered.

Step 4: Bring the bunches of Anton forward along the sides of the hook. Put a couple of not too tight thread winds just a front of underbody. Use a bodkin to pull out and bulk up the over body. Try to keep the over body evenly distributed around the hook.

Step 5: At this point you can put wing pads on the sides of the over body. Tie in dark soft hackles parallel to hook shank no more than three quarters shank length long. Sometimes a small bunch of lighter colored deer hair is added for a wing. Wrap mole fur dubbing or peacock herls for a head.
Closing Comments: Every fly angler needs this and other Gary LaFontaine patterns in their fly box. They are easy to tie and from the reports they are almost magic for catching trout. Then go out and fish them.
Thursday, February 10, 2011
Fly of the Week: Taylor's Shrimp
The Taylors shrimp is one of the first flies I learned how to tie. It is very effective especially in water there scud and fresh water shrimp can be found. I also know a fisherman who ties this pattern on larger hooks for steel head and Salmon on the Columbia River and in fishing ocean bays. As the creator is Marv Taylor I give all the credit to him and this past month I got the story on how he developed the pattern. Marv was fishing a tex favorite on Horsethief Reservoir for a couple of days. he tried other patterns but found the tex to be the most effective. After some more research Marv discovered the fish where taking the Tex favorite as a scud. SO he tied this up with some materials he had with him and it worked even better than the Tex. You will notice that it is tied on a curved hook but as Marv explains you need some on curved to simulate swimming scud and some on straight hooks to show the scud in a resting state. Fish it Deep!!!! that where the scud hang out. This fly is easy to tie in fact of you can tie a Woolly Bugger you can tie the Taylors Shrimp. Colors: yellow and black variegated is best but I have found an olive and black chenille with a sparkle that I think works even better. Don't tell Marv! Also pale light yellow or light pink, natural Orange and very light tan and even a light off white or cream.

Hook: Regular shank (at rest) 8 - 14, weighted with .020 fuse wire; Standard 1X long (swimming) 8 - 14, also weighted.
Thread: Light olive, prewaxed 6/0.
Tail: Light-olive saddle hackle, tied on by the butt, half way down the bend.
Body: Dark-olive and gold (Dark-olive and yellow will work) variegated chenille, size small (Danvilles 0 size) tied halfway down the bend, and wrapped forward.
Legs: Light-olive saddle hackle, tied on at the bend and wrapped forward over the chenille, and trimmed on the top and on the sides.
HEAD: Light olive.

Hook: Regular shank (at rest) 8 - 14, weighted with .020 fuse wire; Standard 1X long (swimming) 8 - 14, also weighted.
Thread: Light olive, prewaxed 6/0.
Tail: Light-olive saddle hackle, tied on by the butt, half way down the bend.
Body: Dark-olive and gold (Dark-olive and yellow will work) variegated chenille, size small (Danvilles 0 size) tied halfway down the bend, and wrapped forward.
Legs: Light-olive saddle hackle, tied on at the bend and wrapped forward over the chenille, and trimmed on the top and on the sides.
HEAD: Light olive.
Wednesday, February 09, 2011
Where did I go?
Sorry all been busy with School and work. Updates will be coming very soon!
Published with Blogger-droid v1.6.7
Wednesday, January 19, 2011
Me and Marv

Published with Blogger-droid v1.6.5
Tuesday, January 18, 2011
Boise Valley Woolly Buggers
Tonight I took Rose and Caleb to there first meeting with the Boise Valley Woolly Buggers.The Boise Valley Woolly Buggers is a young oriented fly fishing club that I have been interested in for quit some time. They teach the kids fly fishing skills, fly tying, and conservation. There motto is "There is more to fishing than catching fish". The youth lead the meetings with adult supervision. The group was start by Boise native and fly fishing legend Clayne Baker whom I first met while fishing out on Warm Lake a few years ago. Clayne's hope is that the youth involved learn about leadership and being a team player. Tonights meetings the kids had an art contest and had to create there own picture of a fish. The winner won a small box of flies that had been provided by one of the fathers. The meeting also featured an inclusive update on area fishing trends and techniques to use in winter weather. The kids also shared fishing stories with each other and at the end had a door prize drawing. Caleb won a large sack full of fly tying materials and drew a second time and won some flies. Rose also won a large sack of tying materials. Both of my kids showed excited attitude before during and after the meeting, in fact they were dang near impossible to get to bed! As a father I am excited to see them interested as much as they are and look forward to more meetings. Our next goal is waiting for a decent day to try out a pond recommended by Clayne to catch some bluegill. Probably try some small midge dry fly patterns or tiny chironomid nymph patterns. My over all impressions of the meeting: The kids ran the whole meeting and all the kids were attentive and non-disruptive. Everyone seemed to enjoy themselves even the adults who kind of watched while sitting at the back of the room or conversing in the hall way while the kids carried on with the meeting. The youth leaders seemed to be conscience and appreciative and complimented each kid as they presented stories, pictures, and came up to accept prizes. I was thoroughly impressed at how well the meeting ran and look forward to seeing my ids participate in a fantastic organization.
Wednesday, January 12, 2011
Fly of the Week: Humpy
The Humpy is a good all around attractor pattern. It can be tied in any color. Some people tie it with a very slim body. Not me, I say if you want a slim bodied, high floater, use a Wulff. Humpys should be big and fat. They float like a cork. They work very well in the summer and fall as they imitate a number of terrestrials. They are also a good searching pattern when no hatch is evident. Generally, it is fished dead drift. But, sometimes I like to use the Humpy as an indicator when fishing small emergers or midges in rougher water and a dropper nymph.
The important thing to remember about this fly is that it is a pattern so you should tie it in a wide variety of sizes and colors. My advice go out to where you are fishing and simply copy color combinations that you see! Good Luck and tight lines.
Materials:
Thread: 8/0, to match body color
Hook: dry fly sizes 10 to 18
Tail: Moose.
Body: Thread.
Overbody and wing: Elk cow.
Hackle: Silver Saddle, furnace and grizzly.
Tying Instructions: Humpy
1. Start the thread halfway at the hook shank. This is important, as it is the reference point for the body. Wrap to the bend, tie in tail, wrap to halfway point. (*You can use 6/0, but I've found that 8/0, because of its smaller diameter, "bites" into the material better than 6/0.)

2. Take a bunch of Elk, remove all underfur, stack well, size (correct size is from tip of the tail to hook eye), and cut to length.

3. Tie the Elk to the hook, wrap towards the bend, keeping the Elk on top of the hook. Wrap until you've completely covered the thread wraps for the tail. Never mind the stubs at the tie-in point - they will disappear later on.

4. Wrap the underbody with thread. Pray that it doesn't break, which happened to me... Lift the Elk, give it a quarter turn, fold it over and tie down on top of the hook shank. This should be at the halfway point. After three thread wraps I lift the wing and put two wraps under the wing around the shank, then three wraps over the wing again. I finish with one wrap around the shank only.

5. Divide the wing, put thread wraps around the base of each wing, post the wings. Lay a thread foundation in front of the wing, making a smooth taper towards the eye. Without this thread foundation the hackle will be all over the place due to the big difference in diameter behind and in front of the wing.

6. Tie in the hackle(s), dull side facing forward. Don't tie the hackle down where the barbs start; leave a short length of bare stem, which will produce a cleaner start of the hackled collar. The ugly spot, where the thread broke, will be covered with the first wrap of the furnace hackle.

7. Palmer the hackles forward, starting with the hackle that was tied in last (here: the grizzly one). Tie off hackles and whip finish.

The important thing to remember about this fly is that it is a pattern so you should tie it in a wide variety of sizes and colors. My advice go out to where you are fishing and simply copy color combinations that you see! Good Luck and tight lines.
Materials:
Thread: 8/0, to match body color
Hook: dry fly sizes 10 to 18
Tail: Moose.
Body: Thread.
Overbody and wing: Elk cow.
Hackle: Silver Saddle, furnace and grizzly.
Tying Instructions: Humpy
1. Start the thread halfway at the hook shank. This is important, as it is the reference point for the body. Wrap to the bend, tie in tail, wrap to halfway point. (*You can use 6/0, but I've found that 8/0, because of its smaller diameter, "bites" into the material better than 6/0.)

2. Take a bunch of Elk, remove all underfur, stack well, size (correct size is from tip of the tail to hook eye), and cut to length.

3. Tie the Elk to the hook, wrap towards the bend, keeping the Elk on top of the hook. Wrap until you've completely covered the thread wraps for the tail. Never mind the stubs at the tie-in point - they will disappear later on.

4. Wrap the underbody with thread. Pray that it doesn't break, which happened to me... Lift the Elk, give it a quarter turn, fold it over and tie down on top of the hook shank. This should be at the halfway point. After three thread wraps I lift the wing and put two wraps under the wing around the shank, then three wraps over the wing again. I finish with one wrap around the shank only.

5. Divide the wing, put thread wraps around the base of each wing, post the wings. Lay a thread foundation in front of the wing, making a smooth taper towards the eye. Without this thread foundation the hackle will be all over the place due to the big difference in diameter behind and in front of the wing.

6. Tie in the hackle(s), dull side facing forward. Don't tie the hackle down where the barbs start; leave a short length of bare stem, which will produce a cleaner start of the hackled collar. The ugly spot, where the thread broke, will be covered with the first wrap of the furnace hackle.

7. Palmer the hackles forward, starting with the hackle that was tied in last (here: the grizzly one). Tie off hackles and whip finish.
Subscribe to:
Posts (Atom)