Wednesday, January 12, 2011

Fly of the Week: Humpy

The Humpy is a good all around attractor pattern. It can be tied in any color. Some people tie it with a very slim body. Not me, I say if you want a slim bodied, high floater, use a Wulff. Humpys should be big and fat. They float like a cork. They work very well in the summer and fall as they imitate a number of terrestrials. They are also a good searching pattern when no hatch is evident. Generally, it is fished dead drift. But, sometimes I like to use the Humpy as an indicator when fishing small emergers or midges in rougher water and a dropper nymph.
The important thing to remember about this fly is that it is a pattern so you should tie it in a wide variety of sizes and colors. My advice go out to where you are fishing and simply copy color combinations that you see! Good Luck and tight lines.

Materials:

Thread: 8/0, to match body color
Hook: dry fly sizes 10 to 18
Tail: Moose.
Body: Thread.
Overbody and wing: Elk cow.
Hackle: Silver Saddle, furnace and grizzly.

Tying Instructions: Humpy

1. Start the thread halfway at the hook shank. This is important, as it is the reference point for the body. Wrap to the bend, tie in tail, wrap to halfway point. (*You can use 6/0, but I've found that 8/0, because of its smaller diameter, "bites" into the material better than 6/0.)


2. Take a bunch of Elk, remove all underfur, stack well, size (correct size is from tip of the tail to hook eye), and cut to length.


3. Tie the Elk to the hook, wrap towards the bend, keeping the Elk on top of the hook. Wrap until you've completely covered the thread wraps for the tail. Never mind the stubs at the tie-in point - they will disappear later on.


4. Wrap the underbody with thread. Pray that it doesn't break, which happened to me... Lift the Elk, give it a quarter turn, fold it over and tie down on top of the hook shank. This should be at the halfway point. After three thread wraps I lift the wing and put two wraps under the wing around the shank, then three wraps over the wing again. I finish with one wrap around the shank only.


5. Divide the wing, put thread wraps around the base of each wing, post the wings. Lay a thread foundation in front of the wing, making a smooth taper towards the eye. Without this thread foundation the hackle will be all over the place due to the big difference in diameter behind and in front of the wing.


6. Tie in the hackle(s), dull side facing forward. Don't tie the hackle down where the barbs start; leave a short length of bare stem, which will produce a cleaner start of the hackled collar. The ugly spot, where the thread broke, will be covered with the first wrap of the furnace hackle.


7. Palmer the hackles forward, starting with the hackle that was tied in last (here: the grizzly one). Tie off hackles and whip finish.

Tuesday, January 11, 2011

We need a little history to make sense of fly rod actions. The first so-called fly rods were wood, and pretty crude. Fly lines were braided horse hair, not very effective either. Eventually rods evolved to cane, then split cane into intricately designed casting tools. Works of art - then and now.Split bamboo soon became the ultimate fly rod and still today is used by traditionalists and collectors.
During World War II, many new products hit the market. Fiberglass was one of them. So was PVC. Dacron and Nylon came out of the war effort too. Lots of innovations that ended up in the fly fishing world.
Fiberglass fabric was wrapped on a wood rod. Epoxy finished and the fiberglass rod was on the market. When the inventors figured out how to do away with the wood center the first hollow rods were born.
Considering the choices available at the time, either split bamboo or steel, the fiberglass rods were designed to copy bamboo. Fake bamboo rods. With a similar action ... as close as possible. Cane fly rods have a soft to moderate action. Some fiberglass rods were very soft and often referred to as "noodley" and the longer the rod, the more noodley it became.
Follow through a couple more decades into the space age and we find the fly rod industry taking advantage of new technology again. This time it is graphite and boron. Almost any material can be formed into threads of some sort. Once it's thread, it can be woven into fabric ... just like fiberglass which appeared in drapes, patching material for cars and boats - and flyrods. Boron was tried and rejected because it was considerably heavier than graphite without additional strength.
Here comes the catch. Those companies who had been making fiberglass rods had everything set up to make those rods to imitate or at least be similar to bamboo. Now there is a new material. What will happen?
Most companies had their machinery, mandrills (steel forms the fabric is wrapped on to make the blanks,) and their reputations established. If you bought one of their rods you knew by reputation how the rod would feel.
Some companies replaced part of the threads in the fabric with graphite. That made the rods lighter, but only slightly changed the action.
New companies had the option to make the same slow or medium action rods already on the market - or to do something entirely different. That's where faster action rods started.
Fast rods that are lighter in your hand, use more of the tip to propel the line, and (if cast correctly) do the work for you. One of the major advantages in fast rods is the person casting it does less work. So you aren't as tired as quickly.
Fast rods are primarily designed with the butt and middle sections built to play the fish, the top one third to cast the line. That does make the tip section (which is tiny compared to rods just a few years ago) vulnerable to breakage if the rod is used incorrectly when playing or landing a fish.
Bottom line? What do you want to fish for? Under what conditions? What can you afford? If you are casting well enough to get the fly where you want it most of the time, you also probably have developed a style - a method that is comfortable for you.
From one who has been fishing for some years, a word of encouragement. There is no such thing as a bad graphite fly rod. All of us would have thought we had gone to heaven if we had been offered any of the rods on the market today 25 years ago. The fly rod industry has made giant leaps improving our sport.
Match the action of the rod, and the price, to what works for you. Final word of wisdom: Don't ever buy a rod you have not cast.

Western Idaho Fly Fishing Expo

This will be the Boise Valley Fly Fishermen's 40th year since its conception and this will be our 7th annual expo. Our mission to promote the sport of fly-fishing through education and conservation activities is dependent upon a successful Expo.
Instruction in fly tying, casting, and fly fishing ethics has been our strength over the years. This year's event will feature several new programs as well as workshops in these areas.
This is a gathering that will allow Idaho and other regional fly tiers to show their talents to the fly-fishing public and exchange ideas, new and old.
Saturday evening, there will be a banquet with a program, dinner, raffle and auction. The Boise Valley Fly Fishermen will earmark funds raised at this event for various regional conservation undertakings.
We've nearly doubled the size Expo Hall,and have a large number of fly tiers who are listed on our tiers page. You'll see demos from high floating dry flies to deep sinking nymphs and tiers that will show you techniques that are guaranteed to make your fly tying and fishing more rewarding.

Saturday, January 08, 2011

slide show

A Step Closer

The Hunter Family reunion was, and still is, and annual event in my family and we often spent Labor Day or Memorial Day getting reacquainted with family members and having fun in the outdoors. A common place to hold the reunion was in the Hagerman Valley. Hagerman is nestled in the Snake River Canyon of central Idaho. The River valley offers many outdoor activities to those wishing to enjoy the outdoors and the area is an oasis in the middle of the southern Idaho dessert. There a hundreds of natural springs and waterfalls that litters the steep canyon walls as the Snake River Aquifer comes to an abrupt end and empties into the Snake River. One such place that we camped on a regular basis was Thousand Springs State Park which featured some of the same spectacular water features described above. On the far end of the park, there is the Thousand Springs Fish Hatchery, a place where my brothers, cousins, and I spent hours fishing in the hatcheries run-off pond, chasing wildlife, and generally causing some kind of trouble.
The run-off pond was actually located in front of the hatchery entrance and wound back towards the camping and picnic area of the park before tapering into a culvert that ran under the entrance road and emptied into the river. At the head of the slew right at the hatcheries front gate was an enormous concrete box with a platform and railing set on top. This was where we fished the most often because the runoff from the hatchery spilled out of the top of the concrete box just below the standing platform. The water cascaded down about a four or 5-foot drop before slamming into pool of clear water below. This of course created a slight current and the fish would congregate at the tail waters of the falls. Even back then I realized this was a great fishing hole because the fish were there because of the food that would run out of the hatchery with the runoff water was easy to get. Therefore, a bunch of kids with some globs of Power bait on the end of their lines could easily make a good day of fishing.
What we would do is stand on the platform, make long casts out past the current section of the falls, and then reel back in to position our hooks in the tail waters and wait. The key to this strategy however was being on the platform so casting and positioning your bait was easy. There were some spots just to the sides of the giant box but these spots where harder to cast from and harder to keep your bait in the tail waters. However on occasion, we would be forced to fish from these locations because other people had beaten us to the standing spots on the platform. There was one advantage though that took a fly rod and some old rusty flies to discover.
After the falls come down off the concrete block and create the rapid something happens just to the sides of the current that you might find more common on a river or stream than you would on stillwater. Eddies! Two of them one on each side of the current that curved back towards the bank and created a couple deep pockets perfect for trout to sit and await food falling and drifting from the falls.. We always saw fish in these pockets of slack water but catching one was nearly impossible since the fish either spooked as you approached the edge of the water or saw your shadow and simply did not take any bait you threw at them.  The fish here often seemed larger than most we caught as well so they were very irresistible to a bunch of fished crazed boys. We had tried several ideas throughout the years ranging from regular baits, lures, and scents to outlandish things like threading gummy bears on the hook. Nothing worked but we never gave up.
One particular year when I was 11 my cousin Bob, who was only a couple months younger than I and often my counter-part in mischief, had acquired an old fly rod and box of old musky flies. As I recall the flies and the rod had once belong to his granddad that had passed on to the other side some years before. The rod was old fashioned with an auto reel and silk braided fly line. The flies were an assortment of wings, feathers, and a bit of rust colored stain blended into most of the fly bodies. We didn’t care however and hurried down to the sides of the platform to put the rod and other gear together. Bob picked out a random fly and lashed it onto the leader. He didn’t really cast it out on the water, it was more of a fling but it gave the line and leader enough distance to put the fly in the middle of the deep slack water. Within seconds of the fly laying on the water the first fish was hooked and Bob dragged in the line contained a very nice rainbow trout. We unhooked the fish put in on the stringer and readied for the next cast which resulting in the exact same result of the previous cast. With in about two or three minutes we had a good number of large fish on the stringer when Bob lost the fly we were using. We tried a couple others but the results were not as good. Instead, we packed everything up and headed back to camp proud as any two boys could be with our catch and feeling triumphant that we had finally cracked the secret to catching those fish out of the slack water.  
A few things contributed to our success that day. The first was just dumb luck I think. We really had no idea what we were doing and this was the first time either of us had used a fly rod or flies to catch fish. The second would be that we were able to get to the fish without being detected. The extra long length of the fly rod, being that it was about nine feet long,  made it possible to stand back further from the edge of the water and thus kept us from being detected by the fish. Lastly, we had picked a fly that was similar in some way to what the fish were already eating. This happened without either of us realizing it but the science behind fly-fishing is duplicating the natural food sources of the fish. Therefore, again by luck, we had simply matched the hatch and the results were, even now, astounding.
It was about this same time that my aunt Holly and Uncle Neil had moved into a house just up the street from where I lived. Neil was big into fly-fishing and fly tying, which was something my dad did not do. On a few occasions, Neil would invite me over to learn how to tie flies. The first was just a generic woolly bugger and some leech patterns. My tying lessons would be short lived however, as just before my 12th birthday we moved from Meridian to a larger house just off the bench in Boise. This move from familiar territory to a new unfamiliar world with new friends, new surrounds, and many challenges for me personally would actually be the catalyst to pushing me further into art of fly-fishing. 

Thursday, January 06, 2011

Cast off to stereotypes

I've never been much of a numbers guy. While I think statistics are great for helping us determine trends or the reasoning behind certain results in life, or business, or sports, figures can also be misleading and even guide us in the wrong direction if we put too much stock into them. Like with fly-fishing, for example. The stats suggest fly fishermen are just that. Men. Make that old men. Grumpy, old, white men, with money - in the $100,000 or more income bracket to be exact, according to The Special Report on Fishing and Boating published last year by the Recreational Boating and Fishing Foundation and The Outdoor Foundation. And as they say, the numbers don't lie, but I encourage my fellow anglers to be skeptical of stats, and the stereotypes they might create, and question the trends of recent years when it comes to the fly fishing community.

Monday, January 03, 2011

Fly of the Week: Lawson's Paradrake

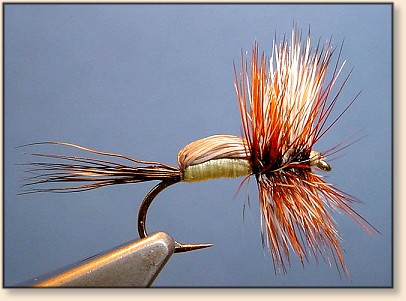
The Lawson Paradrake was designed by the legendary Henry's Fork Guide and Outfitter Mike Lawson. Featured in a number of his books it has become a popular pattern with both still-water and river fisherman. 
Mike Lawson was born and raised in southeastern Idaho, Mike and his wife, Sheralee are both four-generation natives of Southern Idaho. Mike has fished the local trout streams in this part of Idaho all of his life, especially the Henry's Fork. He taught school in St. Anthony for 6 years and worked as a fly-fishing guide during the summer months. Mike and Sheralee also tied flies commercially for many years. In 1977 they opened Henry's Fork Anglers fly shop at Last Chance, Idaho.

Hook: 14 - 10 Dry-fly
Thread 3/0 Black or Dark Olive
Body: Elk hair
Tail: Moose hair
Wing: Elk Hair or Buck-tail
Hackle: Grizzly
Colors: light and dark olive, pale yellow, dun, brown, grey 

1. Start the thread just passed the centre of the hook shank toward the bend. Wrap toward the bend to form a bed of thread and make one wrap back toward the hook eye. Let the thread bobbin hang.


2. Take a stacked bundle of elk hair about one to one and a half times the thickness of one matchstick. Holding it on the nearside of the hook, tips pointing about 30 degrees down, make one loose wrap around the hair and while holding the hair in place pull the thread tight. The hair will spin partially round the shank.


3. Keep the thread in tension and wrap the thread toward the hook eye in further tight turns, stopping short of the bare shank. Cut away the waste butts of hair with a tapering cut.


4. Gather and lift the elk hair to form a wing post. To avoid flaring the hair start the wraps tight and apply less tension for the last one or two wraps at the furthest point as you wrap away from the hook – apply increasing tension as you wrap back toward the hook.


5. Tie in tail material, either pheasant tail or moose hair, long enough that when the body is trimmed it leaves tails of length equal to that of the body. Then prepare and tie in a hackle having barbs the length of the hook. The hackle should be tied in on the wing post as illustrated having the concaved face of the feather toward you.


6. Take the thread to a point two or three wraps short of the hook eye. Take another bundle of stacked elk hair equivalent to approximately four or five matchsticks thickness. Hold the hair close to the ends as illustrated.


7. Cut the butts even and offer up to the hook where the thread hangs.


8. Make a couple loose wraps around the hair then pull the thread tight to spin the body material.


9. Bind the butts of elk hair and let the thread hang down two thirds of the way between the elk hair and the wing post.


10. By pressing your finger to the hook eye, fan out the elk hair like a hackle collar.


11. Stroke and pull the elk hair back around the hook shank and make one wrap of thread around the hair in front of the wing post. Then wrap the thread in a tight open spiral toward the tail.


12. Take the thread passed the bend of the hook to form the extended body and cross wrap the thread back to the front of the body and make a whip finish.


13. Turn the hook in the vice and let the thread hang at the base of the post.


14. Make three or four wraps of hackle and tie off around the wing post. Make a whip finish under the hackle around the post.


15. Add a drop of head cement to the whip finish at the base of the wing post.


16. Trim the tips of elk hair at the tail end of the body and trim away excess tail filaments. I leave three tails like the natural, though it’s doubtful the fish would mind if there were a few extra!? For durability I treat the body with Dave's Fleximent.


The paradrake is meant to represent the larger mayflies like the 'hex', and the green and brown drakes. It's a very buoyant fly that works in almost any flow. The pattern sits with the body on or in the meniscus and can often induce a strike where a heavier dressed pattern is ignored. 
Present the paradrake using standard dry fly tactics, mostly maintaining a drag free drift. Some suggests giving the rod a wiggle to impart movement to the fly during the drift. Emulating the motion of the dun struggling in the surface film this technique can bring a strike on those occasions where an otherwise faultless drift has drawn a blank.
The paradrake is very buoyant so will perform in most situations. Like other large air resistant patterns, it requires an appropriately built leader and a reasonably executed cast to achieve proper turnover. While some might try braided or furled leaders to assist with turnover and accuracy, these systems can also produce a significant amount of leader spray that can alert the trout especially in hard-fished waters. Using mono leaders helps eliminate this issue. It's hard to beat a basic nylon mono tapered leader with matched tippet (2x and 3x).